Noise Reduction
Noise Reduction in DaVinci Resolve Fusion: Why It’s Crucial for VFX
Noise reduction is often mistaken as an aesthetic polish — a way to make footage look smoother. But in the world of VFX and compositing, noise reduction in DaVinci Resolve Fusion is not about looks — it’s about functionality. Whether you’re tracking, comping, or regraining, noise directly affects how stable your work is and how believable the final shot feels.
And while Neat Video themselves recommend applying their plugin in the Color page (which is the best place for most workflows), there are key situations in VFX where you need noise reduction earlier — especially before tracking or compositing.
Where Noise Reduction Matters Most
Noise makes trackers chase pixels that don’t exist.
By denoising first, your tracks lock onto real edges, not random speckle — saving you time and ensuring your VFX work stays precise and stable.

Why Tracking Fails Without Noise Reduction in DaVinci Resolve
Tracking is the foundation of most VFX work. Fusion’s trackers, like all tracking systems, rely on consistent pixel data to follow edges and motion. Noise breaks this consistency by introducing false detail that shifts from frame to frame.
Here’s what typically happens:
- On noisy footage: The tracker latches onto pixels that aren’t real edges, causing drift, wobble, or failure.
- On denoised footage: The tracker sees true edges and real motion, producing stable, predictable tracks.
Professionals sometimes choose the cleanest RGB channel for tracking, but if all channels are riddled with noise, you’re handicapping the track before it starts. By denoising first, you eliminate false motion and give Fusion a solid foundation for accurate tracking.
Comping in Fusion: How Noise Reduction in DaVinci Resolve Helps
Compositing isn’t just about blending colors and edges — it’s about making elements feel like they belong in the same world. Noise is one of the biggest giveaways that something has been composited.
- Different cameras, different noise: Grain structure rarely matches between two cameras.
- Same camera, different settings: ISO or exposure changes can alter noise patterns.
- CG or graphics with no noise: Clean renders stand out against noisy plates.
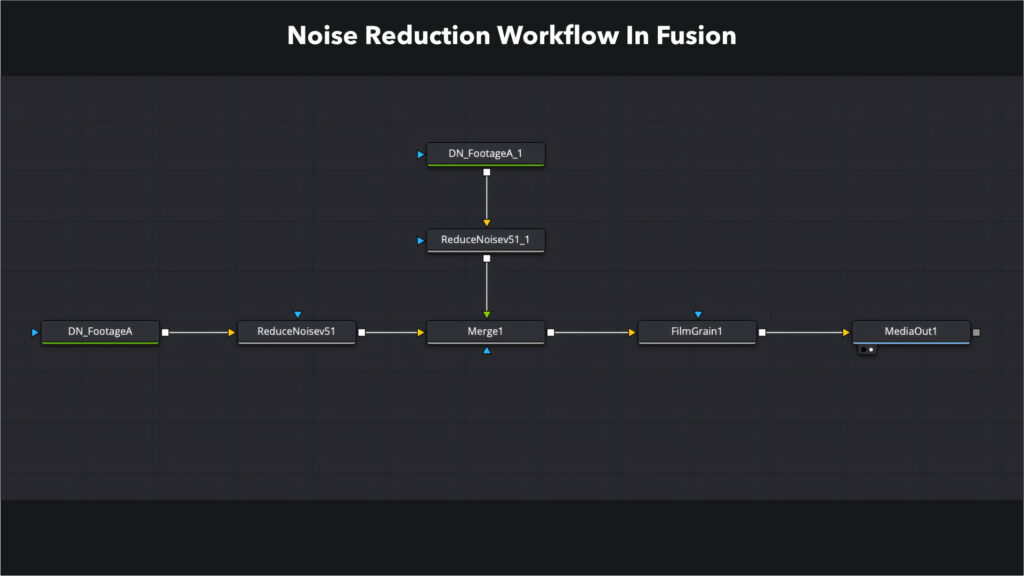
The solution is simple: Denoise first, comp clean, then re-grain.
By denoising both source plates, you unify the starting point. Once the comp is complete, Fusion’s regrain tools allow you to add back consistent, camera-like grain. This not only hides seams but makes the composite feel cinematic and seamless.
Why Neat Video and Noise Reduction in DaVinci Resolve Belong in the Color Page
Neat Video officially advises running their plugin in the Color page. Resolve’s Color page is optimized for noise reduction performance and ensures that all downstream operations — grading, VFX (Fusion Clip workflow), and delivery — benefit from a clean signal. Tracking becomes far more stable once you apply noise reduction in DaVinci Resolve before Fusion.
But here’s the nuance:
- If your workflow involves heavy tracking, rotoscoping, or keying in Fusion, you may need noise reduction before Fusion sees the footage.
- In those cases, a temporary denoise pass inside Fusion can save hours of failed tracks or messy comps.
- You can still keep your “master denoise” in the Color page for the entire pipeline.

“Noise Isn’t Just Ugly — It’s Unreliable.”
Noise reduction in DaVinci Resolve Fusion isn’t about smoothing the image — it’s about giving your VFX workflow stability and precision.
Where Noise Reduction Matters Most
Re-Graining in DaVinci Resolve Fusion: The Final Glue
Denoising alone leaves you with a clinical image that often feels unnatural. Grain is part of the cinematic language, and it acts as a unifying glue in compositing. Compositors rely on noise reduction in DaVinci Resolve to unify noisy plates. Using Neat Video noise reduction in DaVinci Resolve ensures your comp starts clean.
Fusion’s Film Grain and custom regrain tools allow you to:
- Match the density and texture of the original camera.
- Apply consistent grain across multiple layers of a comp.
- Cover minor roto edges or keying imperfections.
By re-graining after a clean comp, you restore the organic feel of camera-captured footage and make your VFX work invisible.
The Takeaway
Noise reduction in Fusion using Neat Video isn’t about “prettier” images — it’s about workability and believability.
- For tracking, denoising stabilizes data and prevents failed tracks.
- For compositing, denoising levels the playing field, while re-graining unifies the final look.
- For workflow, the Color page is the ideal place for Neat Video, but for heavy Fusion tasks, don’t hesitate to denoise earlier for stability.
The truth is simple: noise is chaos, and chaos undermines precision. By denoising before you track or comp, and re-introducing controlled grain afterward, you create a pipeline that is both technically solid and visually cinematic.
We’ve also covered why noise reduction before color grading is critical in DaVinci Resolve — read that here.
